Art Activities to support the Understanding of Pressure

Crayoning and printing activities are great ways for a child to experience and experiment with pressure and the amount needed to create different effects. These activities will also encourage and support a child in helping them to understand, and for you to model, the language associated with pressure and how the pressure used feels. By linking the words used to the feelings and the outcome of using the pressure they can start to understand what is needed when asked to press gently or to press harder. 

When supporting a child to understand what we want when we ask them to press harder, we need to model how our body reacts to make this happen. You may need to exaggerate the actions but as you do this you also need to talk about what your body is doing and how it feels. Then point out the effect that this has had on the crayoning for instance.

When we press hard, we tend to lean our body forward over the table slightly as this allows us to put more force down on to the paper through the crayon. We may feel our arm and hand tense and often the movements made are slower and in small strokes. If it is something we are not used to doing it can make our hand and fingers ache and it will feel like hard work. The crayon marks will be thick and dark.

When we want to be gentler with the crayon, so that the crayoning is lighter in texture and colour, we tend to sit back away from the table. This way the hand moves across the paper more easily and often the strokes are longer and quicker, which sometimes feels as if we have less control over the colouring. This is why young children tend to be a bit heavy handed initially with colouring because their fine motor control skills have not reached a point that enables them to have control.

There are many creative ideas to be found on the internet and in books published by companies such as Usborne.

This crayon technique can be used to create a vast range of pictures. Here are just a couple of ideas to get you started:

Spider Party Time:

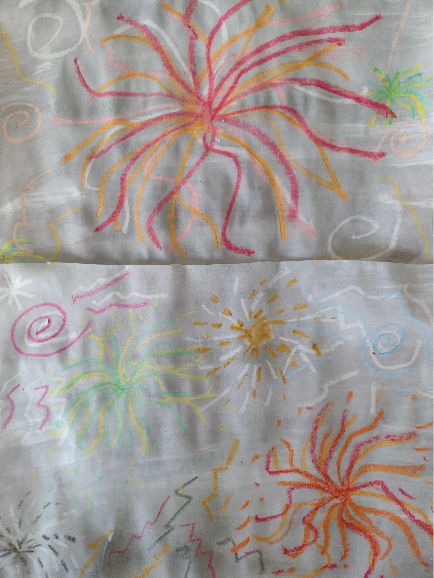
The same technique can also be used to create great firework pictures:
It is also worth remembering that drawing also helps to develop a range of different line formations, also needed for developing a good handwriting style.

Have FUN!

Leaf Investigation, Collecting and Printing

The weather this Autumn has been unseasonably warm, making it easier to go out and explore our local green and wild spaces.

It is amazing how much quality time you can spend with children just looking, talking about and collecting different leaves. The amount of language shared and new vocabulary introduced is invaluable.

It is suitable for all age groups and you don’t need a vast knowledge of plants and trees to make this fun; just remember not to take whole plants or leaves from endangered or dangerous plants and watch out for thorny, spikey and prickly leaves (if you are not sure leave the plant alone). Make sure when collecting leaves, you do not trespass on to other people’s property, or pick from their gardens!

The aim is to look at and talk about the different shapes, sizes, textures, colours and parts of the leaves. There are so many new words you can share. It is important to make sure the words used, especially if new, are age appropriate and help develop the child’s understanding:

  • Shape:  round, oval, heart shapes, oblong, fanned.
  • Size: small, big, tiny, large, bigger, biggest, smallest, smaller, huge.
  • Texture: rough, smooth, bumpy, fluffy, silky, soft, furry, shiny, glossy, feathery, spikey, prickly, thorny, scratchy, hard, stiff, ridged, flexible, bendy, veiny, ragged.
  • Colour: green, brown, tan, orange, yellow, silver, gold, bronze, purple, red.
  • Leaf: stalk (petiole), leaf base, mid-rib, veins, venules, leaf apex, margin (edge), leaf blade (lamina)

Leaf printing is fun and easy!

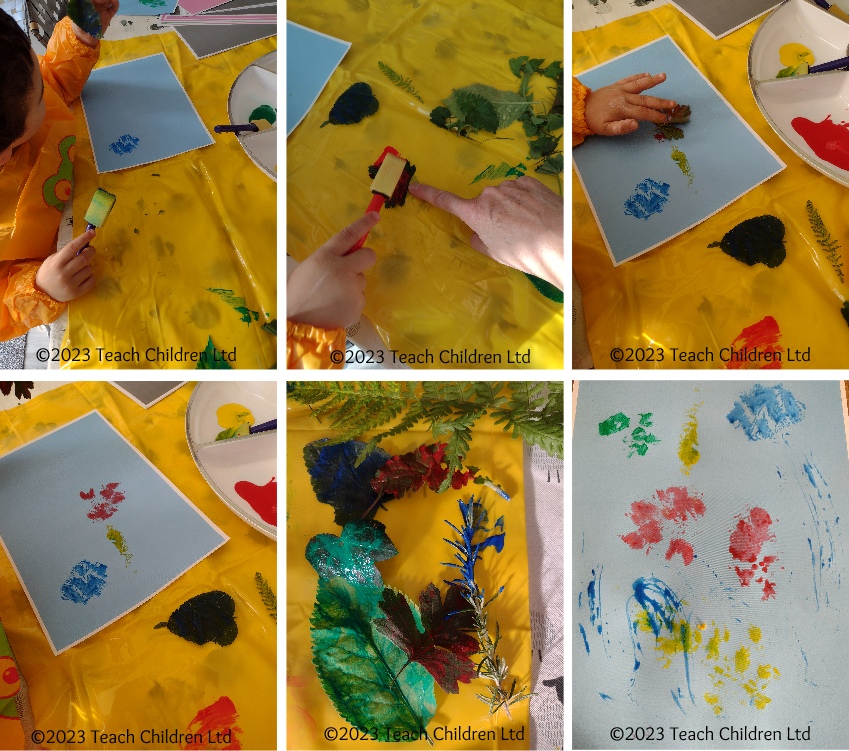
If you have been able to collect some leaves, they can be used to create lovely leaf print pictures and patterns.

The printing activity is a great way of helping children to understand, and for you to model, the language associated with pressure and to experience how the pressure used feels. By linking the words used to the feelings and the outcome of using the pressure they can start to understand what is needed when asked to press gently or harder.  

Materials:

Paper, child safe poster paints, brushes or sponges, leaves collected from walk

Method.

  • Protect the surface being used for painting and aprons for the children
  • Put paint in to trays/tubs
  • It can help to tape the corners of the paper down before you start printing to stop the paper lifting when you lift the painted leaf off.
  • Paint one side of the leaf. This is when we can talk about how much paint (not too thick) and how gentle we need to be. If the leaf tears, due to too much pressure being used, we can support by explaining and helping the child to try again; with maybe a different painting tool or using their finger to give a great sense of feeling.
  • Then pick up the leaf by the stalk, or at one end, and place it paint side down on the paper
  • Encourage the child to gently tap the leaf down on the paper. Help them, if necessary, by demonstrating.
  • Then using the stalk, or from one end, gently peal the leaf off the paper.

The important thing to remember is to chat about what you are doing and have fun!

What are Graphemes & Phonemes?

Last week we started to explain some of the technical language associated with the teaching of phonics, which some new parents may have little or no knowledge of. So, we thought it would be a good idea to continue with this over next couple of weeks to further support you in helping your child.

Graphemes are the alphabet letters, or letter combinations, that represent a single sound (phoneme) in a written word.

An example of a single letter (grapheme) representing a single sound (a phoneme) can be seen in the following words: sat, pat and dog.

Some sounds are represented by two letters and are called digraphs such as the ‘ch’ in ‘chip’ or ‘sh’ in ‘shop’ or ‘ea’ in ‘head’ and the ‘ai’ in ‘rain’.

Other sounds can be represented by 3 (trigraphs) or 4 (quadgraphs) letter combinations such as ‘igh’ in ‘light’ and ‘eigh’ in ‘eight’.

Phonemes are the smallest units of sound of a language; which we blend together to form words.

The English Language has 44 phonemes, 24 consonants and 20 vowels, represented by the unique symbols of the International Phonetic Alphabet (IPA).

The 44 phonemes of English (UK) are represented by more than 280 letter or letter combinations. Most letters therefore never make just one sound and that sound can be made by more than one letter or letter combination.

We have created over 1,000 videos that split words into their individual phonemes, showing which letters are making which sound in each word. You can access these videos in two ways:

  1. If you want to know which letter or letter combination represents a sound, click on the relevant phoneme button on the English Phoneme Chart;
  2. If you want to know what sound a letter or letter combination makes and see supporting animations, click on the relevant letter or letter combination on the Alphabet Keyboard.

We hope you find these useful.

What is the difference between #phonics and #phonemic awareness?

With the new school year well under way many new parents are being introduced to the world of phonics and all the technical language associated with it. So, we thought we would take this opportunity to demystify some of that technical language.

Phonics is the association of sounds (phonemes) to written alphabet letters (graphemes). For reading (decoding) the phonics coding system is used to convert the written word into sounds. For spelling (encoding) the same phonics coding system is used to covert sounds heard into letters to form written words.

Phonemic awareness is our ability to split words into their smallest sound units (individual phonemes) and to manipulate these sounds through segmentation, blending, substitution, re-ordering and deletion. This is based on what we hear and say, not the written word.

Good phonemic awareness is the vital skill required before phonics can be introduced successfully as a tool for learning to read and spell.

  • Segmentation – being able to split words into their individual sounds, for example ‘cat’ into c-a-t.
  • Blending – being able to blend individual sounds together to say a word, for example d-o-g into dog.
  • Substitution – being able to swap one sound for another in a word, for example swapping the /k,(k)/ sound in the word ‘cat’ with a /h,(h)/ sound to say the word ‘hat’.
  • Reordering – being able to swap the sounds around to create a new word, for example changing the order of the letters in the word ‘cat’ to form the new word ‘act’.
  • Deletion (omission) – being able to remove a sound from a word to create a new word, for example removing the /t,(t)/ sound from the word ‘cart’ to say the new word ‘car’.

These are developed further when phonics is introduced, sound to letter association.

Watch our ‘Single Word Reading’ animation to see these manipulation skills in action: https://www.teachphonics.co.uk/phonics-reading-lesson-plans.html